| |
|
Understanding Digital Photo, Graphics, File Properties
JPEG, DPI, Image Size, Quality, Compression
|
To address quality issues in regard to digital photo files submitted to our graphic design department for printing, I decided to write a basic guide about common digital photo properties. I'll start with a summary of file size in relation to printing, and then get into more detail. A lot of this information should be useful to the public in general.
Let's begin with some basic definitions.
pixels - They're the dots of color that make up your photo, a pixel = a dot.
file size - A measurement typically expressed in kilobytes (KB) or megabytes (MB). 1,000 KB is equal to 1 MB. Example: the photo is 600kb, or the photo is 12mb.
image size - The number of pixels in length, and pixels in width, a photo or graphic is. Example: the photo is 3,000 pixels x 2,000 pixels.
dpi - dots per inch. 300 dpi means a file has 300 dots, or pixels, across every 1 inch within it.
jpeg, jpg - Probably the most common and popular way of saving picture files. The reason is that they're typically smaller than other image file types, and they can be viewed easily in many software applications. Photos of this file type use lossy compression, which means that data is lost when they’re saved. The quality of a jpeg file is less than what a digital camera or scanner is capable of saving, unless jpeg is their only file saving option.
A basic thing to know about digital photo files is what their properties are.
Here's how to check that out on a Windows PC. |
PHOTO OR GRAPHIC IMAGE SIZE
(DETERMINE WITH A PC)
Right-click on the actual photo file. A list of options will pop up with "Properties" at the bottom. (Fig.1) Left-click on "Properties." A window will open with two tabs at the top, "General" and "Summary." (Fig.2) Left-click the "Summary" tab. Midway down that tab you'll see "Advanced." (Fig.3) Left-click on "Advanced." You can now see the Width and Height of your photo in pixels (Fig. 4), as well as the dpi resolution.
PHOTO, GRAPHICS, FILE SIZE (KB and MB)
There are many ways to talk about the size of a digital photo. One might refer to the file size with how many KB (kilobytes) or MB (megabytes) it is. For our graphic design and printing purposes, files that score in the KB range generally are not optimal. |
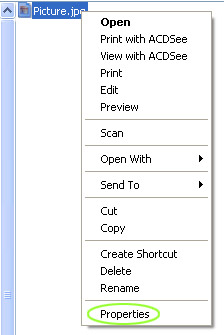
Fig. 1 - file properties, Windows, PC |
This is because a file under 1 MB doesn't have a good printable pixel count (image size), and/or it has been compressed too much and has artifacts (see JPEG FILE QUALITY SETTINGS - COMPRESSION below). Reasons to save small jpegs would be for emailing or displaying photos on a web page. In those situations, small file sizes are better, but for printing it's generally the opposite. We’re frequently sent Internet display size photos that our clients think are printable quality. Making a nice photo print, even a small one like business card size, can be quite a challenge given a photo formatted for email. It's equivalent to making diamonds from coal. A photo doesn’t need to be very large to look good in email, or on the Internet, but the same file can potentially produce a pretty low quality print.
When we look at files submitted to our company for printing, two things are considered in relation to print quality, photo image size (pixels length x pixels width), and jpeg compression artifacts. Each of these affects our ability to make a quality print. |
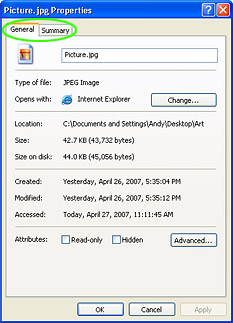
Fig. 2 - file properties, summary, general |
PHOTO IMAGE SIZE vs. DPI
I've heard some of our photography clients ask for 300 dpi photo files without providing any other specification, like how many inches at 300 dpi, or how many total pixels. Dpi has little to do with image quality in printed digital photo files. What’s more important is the gross pixel count, or pixels length by pixels width. A good-sized photo in email, or on the Internet, might be something like 600 x 300 pixels at 72 dpi. Traditional printing is typically conducted at 300 dpi. If you were to print the same 600 x 300 pixel file at 300 dpi, the resulting image would be 2 inches x 1 inch (600 pixels/300 per inch x 300 pixels/300 per inch), or only about a third the size of a business card.
The following example files would generate an identical looking print on most consumer inkjet printers. |
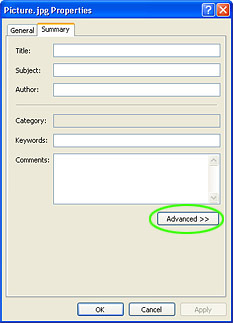
Fig. 3 - file properties, advanced button |
300 dpi, 10 inches x 7 inches =
150 dpi, 20 inches x 14 inches =
75 dpi, 40 inches x 28 inches =
all are 3,000 x 2,100 pixels image size
In this example, the dpi figure is pretty much irrelevant because the total printable pixels (image size) are the same.
The inch size figures I'm giving are what you'd get in a print only if you actually printed the files at their source dpi. Consumer inkjet printers don't do this. Current models have software that translates the source photo dpi to a standard print size, 4x6, 8x10, etc.. Print quality is affected much more by total pixels length by total pixels width than what dpi the file was saved at. As long as each of these files was saved using the same quality jpeg compression, they're going to look the same in an inkjet print. |
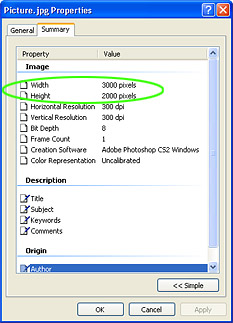
Fig. 4 - file details, image size, dpi |
JPEG FILE QUALITY SETTINGS – COMPRESSION
In image and print quality, jpeg compression is at least as important as the number of source pixels. Saving a file in the jpeg format uses a method of making it smaller called lossy compression. Lossy compression provides a smaller file by sacrificing some data. Have you every seen a digital photo that looks like there are stair steps or jaggy edges to objects, possibly what looks like graininess? In jpeg files, this distortion is a function of how much compression was used when the photo was saved. Graphics software programs and camera manuals typically refer to it as jpeg image quality. A high quality jpeg is not compressed as much as a low quality one. Imagine a rose with 100 shades of red in real life. A compressed jpeg photo of the flower might represent 80 shades of red in best quality, 60 in medium, and 40 in low quality, or highest compression. |
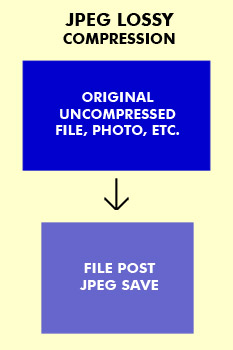
Fig. 5 - jpeg, lossy compression |
| Another example would be making a book smaller by removing all the words “the” from within the text. You’d still have a semi-readable book, but the quality would be lower. If you're saving a jpeg for printing purposes, be sure to do it in the best quality mode. If you open a jpeg in a graphics editing program, don’t resave it as a jpeg again. Each time you do that, the software will kick out more data as it recompresses the file. If you need a smaller size jpeg photo for something, use the "save as" feature, and give your file a name different from that of the original jpeg. |
SOURCE PHOTO PIXEL DIMENSIONS FOR EDITING
(OUR COMPANY SPECIFICATION AND WHY)
For graphic design editing and printing, our company likes to begin with customer-supplied digital photos that are at least 1.5 times the end print size. Sometimes we have to crop, edit, and resize a photo for final print. This gives us the extra room to do it. Here's an example if we were to print a 2 x 3 1/2 inch standard business card at 300 dpi. The customer-supplied digital photo would ideally be at least 900 pixels x 1575 pixels. Here's how I arrived at those numbers.
(2 inches print size x 300 dpi x 1.5 = 900 pixels) X (3.5 inches print size x 300 dpi x 1.5 = 1575 pixels)
To determine whether a digital photo is an appropriate size for preprint graphic design editing, use the above formula, but in reverse. Given the total pixels length and width of a file, use division to see how many useable inches there are. Divide the width and height numbers by 300 dpi, and then by 1.5. If the end numbers are equal to or greater than the final print size, the source file is most likely big enough for our art department layout and editing. If you're reading this and just want to print something on your inkjet printer, the photo would not need to be 1.5 the final print size. Depending on how high quality the source photo is, it could be equal to or even lower in size than your intended inkjet print. We like to have extra image size for editing purposes, but homemade prints may not need it at all. Here’s an example image size test for our art department where the source file is 3,000 x 2,000 pixels, and we need to print a 3 1/2 x 5 1/2 photo with text on it.
(3,000 pixels / 300 dpi = 10 inches / 1.5 = 6.7 inches which is greater than 5 1/2 inches) (2,000 pixels / 300 dpi = 6.7 inches / 1.5 = 4.4 inches which is greater than 3 1/2 inches)
In this example, the source photo should be large enough for the final print, as long as the image quality is good.
Hopefully this article leaves you with a greater understanding of common digital graphics terminology in practical everyday terms.
Andy Williams / CritterZone.com
|
All graphics and text that appears
on this webpage is copyrighted and
may not be copied or used in any way
without permission from CritterZone. |
Save this page:

|
|
|
|